Continuing
our series of articles on getting the most out of the VistaPrint card design
tool, this time we'll be discussing how to centre text and image objects in the
card and also how to save your card designs as a bitmap.
Centring
Text Objects in the Card
Nb.
In common with the previous article on how to standardise object widths, this technique
can be used by either aligning the borders of the sizing boxes or the borders
of the object itself. In this example, the contents of the text box only just
fits in to the printable area of the card, so we will use the borders of the
object.
 We'll
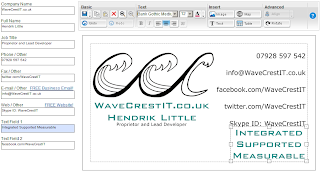
start with an uncentred text object, with the text split across three lines. First
align the right hand borders of the object with the right hand border of the
printable area of the card.
Then
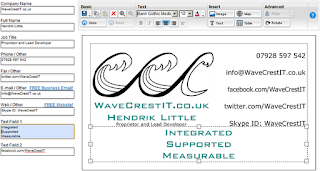
use the left hand sizing box of the object to align the left hand border of the
object with the left hand border of the card's printable area. Ensure that the
text in the object is centre-aligned by
using the Align Centre button.
 You
will note that the text box uses the minimum number of lines to display its
contents. In order to display the text on three lines, as it was before, you
need to alter the contents of the text box itself. First, make sure that the
text contents control, located at the left of the screen, highlighted in blue,
matches the contents of the required text box. If it doesn't, click on the text
box. Then click on the highlighted text contents control. Move the cursor to
the beginning of every word where you want to split the line, in turn, and press
'Return'. Your text should now be split as desired but still centred in the
card.
Saving
Your Card Designs as Bitmaps
The
VistaPrint card design utility allows you to preserve your layouts for several
months while you are offline, without deleting them, but not indefinitely. It is a good idea,
therefore, to have a copy of your card designs saved on you computer, for
safekeeping. It can also be useful to have copies of your designs to show to
others, without printing them, as well as for other purposes. Documents like the ones in this series, for example. We will now see how to save your
card layouts as bitmaps on your own computer. Nb. This technique only works for
Windows. If you use a different operating system, the method for saving the contents
of the screen as a bitmap will be different and you may have to use an extra
piece of software for that purpose.
 We
will start with a finished card layout, inside the browser. Make sure that all
the contents you want to preserve are all displayed in the browser window and
the browser window is active. To make sure of this, click on the title bar of
the browser window.
 Next, hold down the 'Alt' key. This should be located at the bottom of the keyboard, to the left of the space bar. Then, while keeping the 'Alt' key held down, press 'PrtSc' or 'Print Screen'. You should find this key near the top right of the keyboard. It may have another command also written on the key, for example, 'SysReq'. You don't have to worry about this. The purpose of these keypresses is to copy the content of the browser window to the clipboard. If you don't know what this means, don't worry about it, just trust me!
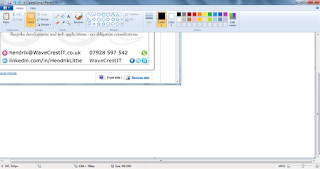
 You will now need to open up a copy of Microsoft Paint, or your favourite graphics editing program.
Then paste the contents of the clipboard into the program. This can be done in
Paint by selecting 'Paste' then, under that, 'Paste' again, or by pressing
'Ctrl V'.
By
clicking and holding down the left mouse button on the image of the browser
contents, you can move it towards the top left hand corner of the Paint window,
so as to cut off anything above or to the left of your card layout.
 Then,
use the scroll bars of the Paint window to bring the bottom right hand corner
of the image into view. This should now have broad, white borders below and to
the right of the image of the browser, as you have moved the top left part of
the image out of the Paint window. Click inside the Paint window, inside the
blank white area, near the bottom right of the window. This should de-select
the browser image. It will also move the sizing boxes from the bottom right hand of the browser
image to the bottom right hand corner of the main image.
Now use the bottom
right sizing box to eliminate the bottom right hand parts of the card image
that you don't need. You can now save the image of your card design as a
bitmap.
Next time, how to use an image as a watermark for your business card.
[Edit 30/03/2013]
You can now download the Centring Text Objects in the Card article as a printable PDF file.


No comments:
Post a Comment