This
the second in our series of articles on how to get the best from the VistaPrint
business card design tool. This time we'll be talking about how to take a
group of objects, that need to be displayed at different heights, and
distributing the vertical space between them evenly.
Evenly Distributing Vertical Space
Between Objects
You
may recall from the last article that we had a set of text boxes that had all
been set to the same width but had different amount of vertical space between
them. We'll start from there. It should be noted, to start with, that this tip
is a little bit trickier than the previous technique. We will be doing
things in what may appear to be a slightly odd way, so take care.
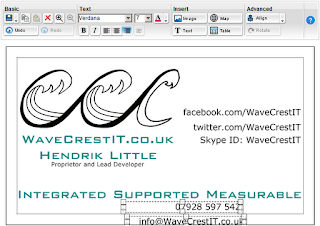
 First,
select the object which you want to be at the top of the group. Then move it so
that its bottom sizing boxes exactly
align with the bottom of the safe
printing area, as in the illustration. Then move the object you want to be
immediately below that so that its top
sizing boxes exactly align with the bottom
of the safe printing area, as shown.
Note
that the controls are no longer horizontally aligned. This is fine so long as we
have used the previous technique to give them all the same horizontal width. After
we have evenly distributed the controls, we can re-align them by selecting them
all and aligning them to the right or left and then moving them to any position
we want.
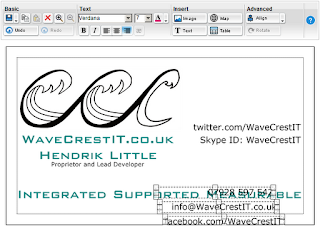
 Next, we need to select both of the
controls and move them so that the bottom sizing
boxes, of the bottom object, exactly align with the bottom of the
safe printing area. Then move the third from top object so that its top sizing boxes exactly align with the
bottom of the safe printing area, as
in the illustration.
Again,
note that the horizontal alignment of the objects is not significant at this
stage.
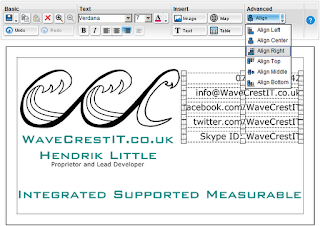
We
continue this procedure, selecting and moving an extra object each time, so
that the bottom sizing boxes of the bottom object match the bottom of the
safe area and then moving the next object so that it's top sizing boxes match the bottom
of the area, as shown.
 Still
with us? Excellent because that's the hard part. All you need to do now is
select all the objects, move them to a convenient position and align them to the
left or right. It doesn't matter which, as, if you have followed the instructions
from the previous article, all the objects will all be of the same width.
Refinements:
By
now, you may well have noticed that this technique only allows you to position
objects at a fixed vertical distance from each-other. To have different spacings,
I suggest temporarily changing the font and text size so that the text boxes
reset to a greater or lesser height, performing the procedure and then
returning them to the desired font settings. You will probably have to
experiment with different combinations of fonts and sizes to get the spacing
you want but, having done this, you can vertically space your objects with
exact precision.
You may also find that, with larger fonts and text sizes, your
text will run onto more than one line. In this case I suggest deleting sections
of the text, before distributing the text boxes, and then restoring the full
text after the objects have been properly positioned.
Next time, we'll talk about centring objects in the card and saving your designs as bitmaps.
[Edit 30/03/2013]
You can now download the Evenly Distributing Vertical Space Between Objects article as a printable PDF file.
[Edit 30/03/2013]
You can now download the Evenly Distributing Vertical Space Between Objects article as a printable PDF file.


No comments:
Post a Comment