Images
are naturally a common method of making a business card more attractive or
professional looking. Vistaprint allows you to upload images and display them
on both the front and reverse sides of the card. Once uploaded, images can be
moved, resized and have a number of colour effects applied to them. An image
need not just be your logo. You could have icons for your contact details,
custom bullet points, pictures demonstrating your products or services or a
self portrait. You could even design your whole card as an image, outside of
Vistaprint, and upload it as a single object before printing it. It is that
last technique that we will touch on in this article.
The
downside of having an image rich business card from Vistaprint is, of course,
cost. Vistaprint charge you a significant surcharge (typically about 30% of the
base cost of the card) for each uploaded image on your printed card. But here's
the good news: I'm going to tell you how to completely circumvent these
additional charges and how, with some additional work, you can only be charged
for printing a single image.
Warning:
This technique is a relatively complex and time-consuming, relies heavily on
methods decribed earlier in this series and involves some arithmetic and a
significant amount of image preparation, outside of Vistaprint. The upside is
that the savings are potentially considerable. I reduced the cost of two
hundred and fifty business cards, on a twenty-one day order, from over £35 to
less than £13 by combining seven images into one, using the method below.
That's a saving of over sixty-five percent!
Combining Images into a Single File
 The
first step is to design your business card in Vistaprint, using as many
uploaded images as you want, arranged however you choose. Next, save this card
and then save a copy of the card under a different name. We will work in this
copy and preserve the original in case any errors ocurr in the re-design
process.
The
first step is to design your business card in Vistaprint, using as many
uploaded images as you want, arranged however you choose. Next, save this card
and then save a copy of the card under a different name. We will work in this
copy and preserve the original in case any errors ocurr in the re-design
process.
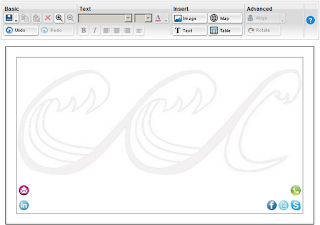 Delete
any text object that overlays or comes close to an image. Then save a bitmap
image of your card, as described in this earlier article. This image will be
used as a template for creating a single image combination of all the images
used in your card, at the highest possible resolution, ie. the best possible
image quality.
Delete
any text object that overlays or comes close to an image. Then save a bitmap
image of your card, as described in this earlier article. This image will be
used as a template for creating a single image combination of all the images
used in your card, at the highest possible resolution, ie. the best possible
image quality.
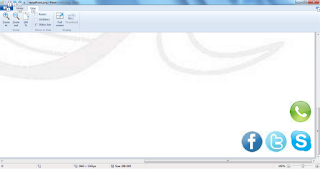
Load
the bitmap image into Microsoft Paint. Now, in a separate copy of Paint, load
the image you had to scale up the least or down the most, in order
for it to appear the correct size on your business card. We will refer to this
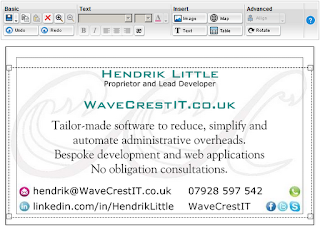
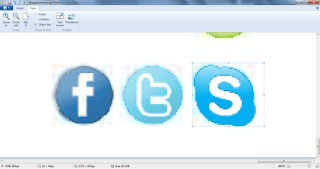
as the hi-res image. As an example, I used seven images for my card, a logo
that I had turned into a watermark (as described in this article) and six icons
which I use to illustrate different forms of media that I can be contacted on.
These icons were taken from different sources and originally had different
image sizes. I uploaded them as they were and scaled them in the Vistaprint
card designer so that they showed as the correct size. The logo is obviously
the largest image I used and the original image file I uploaded has the largest
dimensions. However, as it fills most of the background of the card, I actually
had to scale it up slightly, in order
for it to appear the size I wanted. When I uploaded the contact icons, I had to
scale all of them down somewhat, for
them to appear properly. As it happens, the icon I had to scale down the most
was the Skype icon, the white 'S' on the light blue background. In this
example, this will be referred to as the hi-res image and the original file
version of this image, that was uploaded to Vistaprint, should now be loaded
into a separate copy of MS Paint.
 Now,
using the Select tool in Paint, click precisely on the highest point of the
version of the hi-res image you have in the card image bitmap. Holding down the
mouse button, move the bottom of the Select area to the precise lowest point of
the hi-res image and release the mouse button. You may want to zoom the screen
in to make this process easier. In the status bar at the bottom of the Paint
window, second icon from the left, there should be an icon which is a dotted
box outline with two arrows, one to the left pointing up and one below,
pointing right. The figures to the right of this icon tell you the dimensions
of the select area. The right hand one tells you the height, in pixels. This is
the figure we are interested in. In my example, the figure is 45px.
Now,
using the Select tool in Paint, click precisely on the highest point of the
version of the hi-res image you have in the card image bitmap. Holding down the
mouse button, move the bottom of the Select area to the precise lowest point of
the hi-res image and release the mouse button. You may want to zoom the screen
in to make this process easier. In the status bar at the bottom of the Paint
window, second icon from the left, there should be an icon which is a dotted
box outline with two arrows, one to the left pointing up and one below,
pointing right. The figures to the right of this icon tell you the dimensions
of the select area. The right hand one tells you the height, in pixels. This is
the figure we are interested in. In my example, the figure is 45px.
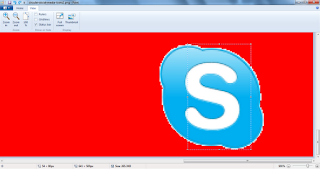 Next,
follow the same procedure for the original file for the hi-res image. You may
be able to simply select the entire image, if the original image has no borders
or other space or imagery around it. In my example, this was not the case. The
height of the hi-res image, in my example of the original file, is 90px.
Next,
follow the same procedure for the original file for the hi-res image. You may
be able to simply select the entire image, if the original image has no borders
or other space or imagery around it. In my example, this was not the case. The
height of the hi-res image, in my example of the original file, is 90px.
Okay,
here comes the maths. Divide the height of the image in the original file by
the height in the card bitmap image. In my example, this is co-incidentally
very easy, as it is 90/45 which equals exactly 2. Your figure is likely to not
be so precise but don't worry about this too much. Now multiply that number by
100 and store it in your calculator memory, or write it down. You now only need
the figures before the decimal point.
 In
the card image bitmap (which we are using as the template for the combined
images, remember) de-select any parts of the screen. You can do this by simply
clicking on the 'Fill' icon, for example. Now click on 'Resize' and tick the
'Maintain aspect ratio' check box. Type the calculated figure into the
'Horizontal' text box. The same figure should be repeated below, in the
'Vertical' box. If not, type it in yourself. Click 'OK'. The whole image should now have been
rescaled to match the resolution of the hi-res image.
In
the card image bitmap (which we are using as the template for the combined
images, remember) de-select any parts of the screen. You can do this by simply
clicking on the 'Fill' icon, for example. Now click on 'Resize' and tick the
'Maintain aspect ratio' check box. Type the calculated figure into the
'Horizontal' text box. The same figure should be repeated below, in the
'Vertical' box. If not, type it in yourself. Click 'OK'. The whole image should now have been
rescaled to match the resolution of the hi-res image.
 Copy the hi-res image
from the orginal file and paste it over the lower quality image in the scaled
card image bitmap. Now save the card image bitmap, with a different name. This
file is now the combined image template.
Copy the hi-res image
from the orginal file and paste it over the lower quality image in the scaled
card image bitmap. Now save the card image bitmap, with a different name. This
file is now the combined image template.
 You
now need to re-scale all of the component images to match the resolution of the
template image. (Sigh. I told you it was involved. Just keep thinking of the
savings!) To do this, measure their heights in the template and their original
files and calculate the scaling factor, as before. Then select the images from
the original files and perform the re-scaling procedure using 'Resize', again,
as you did earlier. Because you have a selection this time, only that selection
will be re-scaled, not the entire image. Copy the selection and paste it into
the template image, over the corresponding, lower resolution image. Repeat this
procedure for all of your component images, saving under a different version
name each time, in case of mistakes.
[Edit 17:25 20/09/2012 : I haven't done it in the illustration but don't forget to re-scale your main logo in the same way as all the other images!]
Once this is done, you should hopefully have
a combined image, suitable for uploading to Vistaprint! You may feel the need
to do a little cleaning up of the image first, using the 'Eraser' tool or some
other technique.
You
now need to re-scale all of the component images to match the resolution of the
template image. (Sigh. I told you it was involved. Just keep thinking of the
savings!) To do this, measure their heights in the template and their original
files and calculate the scaling factor, as before. Then select the images from
the original files and perform the re-scaling procedure using 'Resize', again,
as you did earlier. Because you have a selection this time, only that selection
will be re-scaled, not the entire image. Copy the selection and paste it into
the template image, over the corresponding, lower resolution image. Repeat this
procedure for all of your component images, saving under a different version
name each time, in case of mistakes.
[Edit 17:25 20/09/2012 : I haven't done it in the illustration but don't forget to re-scale your main logo in the same way as all the other images!]
Once this is done, you should hopefully have
a combined image, suitable for uploading to Vistaprint! You may feel the need
to do a little cleaning up of the image first, using the 'Eraser' tool or some
other technique.
Don't
be concerned that some of the images may appear to be of varying quality, they
are at the maximum quality that they could be. Remember that you originally had
them re-scaled in Vistaprint, where they appeared much smaller and it was hence
more difficult to judge their resolution.
Open your original card design in Vistaprint. Save it under a different name. Delete
all the images. Upload the template image to Vistaprint. The quality of the
image as it is displayed should be the same as the original card design and,
after a little re-scaling and moving around, it should align properly with the
text and any other objects in the layout. Done!
When
you come to print the card, you should note that you are now only being charged
for a single image, and not for multiple images, as you were before. You're
welcome!
This is the last of my articles on Vistaprint, for the moment. Next time we will talk about various strategies for getting the most value out of the business networking site, Linked In.
[Edit 30/03/2013]
You can now download the Combining Images into a Single File article as a printable PDF.


